How to install the Chamelio AI package for Salesforce
Last updated: August 2, 2026
This guide is for the Salesforce administrator / IT team installing the Chamelio Salesforce integration. Follow the parts in order.
Need help during install? Contact the Chamelio team — they confirm each connection from their side.
Overview
The Chamelio Salesforce integration is made of two independent parts.
Part A — Chamelio managed package
Installed into your Salesforce org from a link Chamelio gives you. It contains:
• Canvas app component — shows Chamelio tasks directly on record pages
• Custom object Chamelio__Chamelio_Contract__c
• Settings page — used to link the package to your Chamelio org.
• External connected app — backs the canvas app component so it can authenticate the logged-in
Salesforce user.
Part B — Connected App (data sync)
A Salesforce Connected App that lets Chamelio talk to your org over the API. It allows Chamelio to:
• Read account / record information.
• Read + write the Chamelio__Chamelio_Contract__c custom object.
• Manage ETL to sync contracts — only if separately configured; out of scope for this guide.
Prerequisites
Complete these before starting.
□ Salesforce Administrator access to the target org.
□ API access enabled in your Salesforce org.
□ A Chamelio account at app.chamelio.ai with admin rights to your org.
□ A dedicated service account user in Salesforce (strongly recommended — see note below).
□ “Approve Uninstalled Connected Apps” permission enabled for the user that performs the connection.
□ Instaletion link for your target environment (will provide by Chamelio team)
Recommendation: use a service account. Connect both the Connected App (in Salesforce) and the integration (in Chamelio) using a dedicated service account user, not a personal account. This keeps the integration working if individual employees leave or change roles.
Part 1 — Install the Chamelio managed package
1. Open the installation link for your target environment (it opens the managed package install screen in your org)
2. When prompted, approve third-party access and complete the install.
3. Open the Chamelio Admin Settings page at /lightning/n/Chamelio__Chamelio_Admin_Settings and click Authenticate to link the package to your Chamelio org.
1a. Make the external connected app visible to component users
The package ships an external connected app that powers the canvas component. Every profile whose users should see the Chamelio component must be granted access to this connected app — this is required, not optional.
1. Go to Setup → External Client Apps → External Client App Manager, find the Chamelio app and open it.
2. Click Edit Policies. Under OAuth Policies → Permitted Users, select “Admin approved users are pre-authorized” and Save.
3. Back on the Manage page, under Profiles (or Permission Sets), click Manage Profiles / Manage Permission Sets and add every profile / permission set belonging to users who will see the component. Missing a profile means those users can’t load it.
Tip: Safe to grant broadly. The component itself is protected per-user — each user authenticates with their own Salesforce session, so they only ever see their own Chamelio tasks. Granting connected-app access to many profiles does not expose anyone else’s data, so when in doubt, include the profile.
Warning: If a user’s profile is not permitted on this connected app, the component will fail to load and Salesforce shows that user an error on the record page.
1b. Add the component to record pages
Add the Chamelio canvas component to the Lightning record pages where users should see their tasks (Account, Asset, Opportunity, Contact, Lead, …).
1. Open the target record page in the Lightning App Builder (record page → Setup → Edit Page).
2. In the Components panel, find the component named Chamelio (drag-and-drop it onto the page).
3. Recommended placement: drop it into the right-hand panel of the record page — this is the optimal location for visibility without crowding the main record details.
4. Save
Note: Until the Connected App is installed (Part 2), the component will show an “Organization not connected” message. —
Part 2 — Connect the Connected App (data sync)
This connects Chamelio to your org for reading records and writing the Chamelio contract object.
1. Log in to app.chamelio.ai (use the service account, ideally).
2. Go to Settings → Org Integrations. 3.Select Environment (Production or Sandbox) and Click
Connect
OAuth scopes requested by the Connected App: api, refresh_token, offline_access, id, profile, email, address, phone.
3. Confirm the connection shows as Connected in Chamelio.
Note: If on the Authorization page, you see “OAUTH_APPROVAL_ERROR_GENERIC” error, it means the service account does not have the permission to install (“Approve Uninstalled
Connected Apps” is need to be enabled on the service account)
Part 3 — Salesforce permissions (required)
The connecting user (service account) must have the right object and field access.
3a. Assign the “Chamelio Admin” permission set
The managed package ships a “Chamelio Admin” permission set that grants full access to the Chamelio__Chamelio_Contract__c object and all its fields.
□ Assign the “Chamelio Admin” permission set to the connecting user (service account).
Assigning this permission set covers all required access to Chamelio__Chamelio_Contract__c — no manual object or field-level configuration on that object is needed.
3b. Grant access to your source objects
The “Chamelio Admin” permission set covers the Chamelio object, but not your own objects. Verify the connecting user also has, on its profile / permission set:
□ Read access to every object Chamelio needs to read from (e.g. Account, Opportunity, Contact, Lead, Asset, and any custom objects used in your workflows).
□ Field-level security (FLS) allowing access to each field used by your workflows — including relationship/lookup fields.
□ If any field requires a specific license, confirm the service account holds it.
Part 4 — Verify the installation
□ In Chamelio, the Salesforce connection status shows Connected.
□ Open a record page (e.g. an Account or Opportunity) — the **Chamelio component alow to connect □ Initiate a workflow from a sample record
Sandbox → Production migration
When moving from a sandbox to the live org:
1. Install / verify the managed package in Production (Part 1).
2. Swap the Connected App connection in Chamelio against Production:
• Select Production environment and Click Connect again 3. Re-verify permissions on the Production service account (Part 3).
4. Re-run the verification steps (Part 4).
Troubleshooting
Component fails to load on record pages (Salesforce OAuth error)
Likely cause: User not permitted on the external connected app (Part A)
Fix: Part 1a - add the user's profile/permission set
Component shows “Organization not connected”
Likely cause: Connected App not installed (Part B)
Fix: Part 2 = connect the Connected App in Chamelo (Settings -> Org Integrations -> Connect)
Connection won’t authorize OAUTH_APPROVAL_ERROR_GENERIC)
Likely cause: “Approve Uninstalled Connected Apps” missing (Part B)
Fix: Enable the connecting user (Prerequisutes)
Canvas - show no permissions
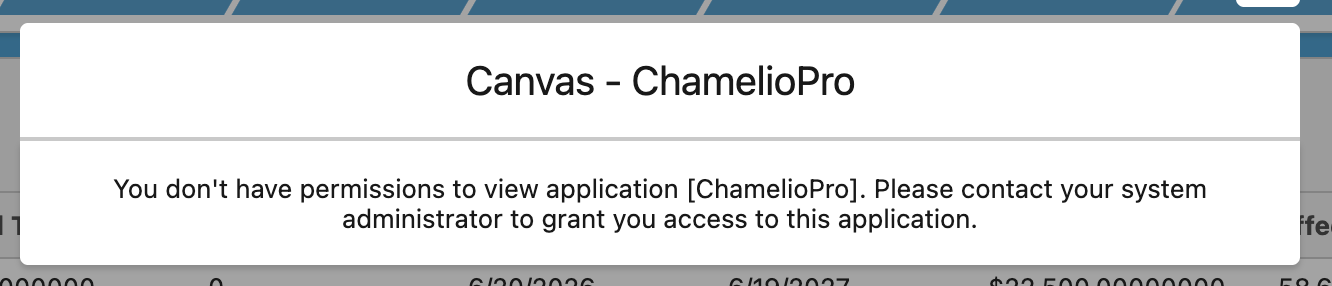
Likely cause: access to the Canvas App was no granted
Fix: Part 1a (Go to Setup → External Client Apps → External Client App Manager, find the Chamelio app and open it)